 Save
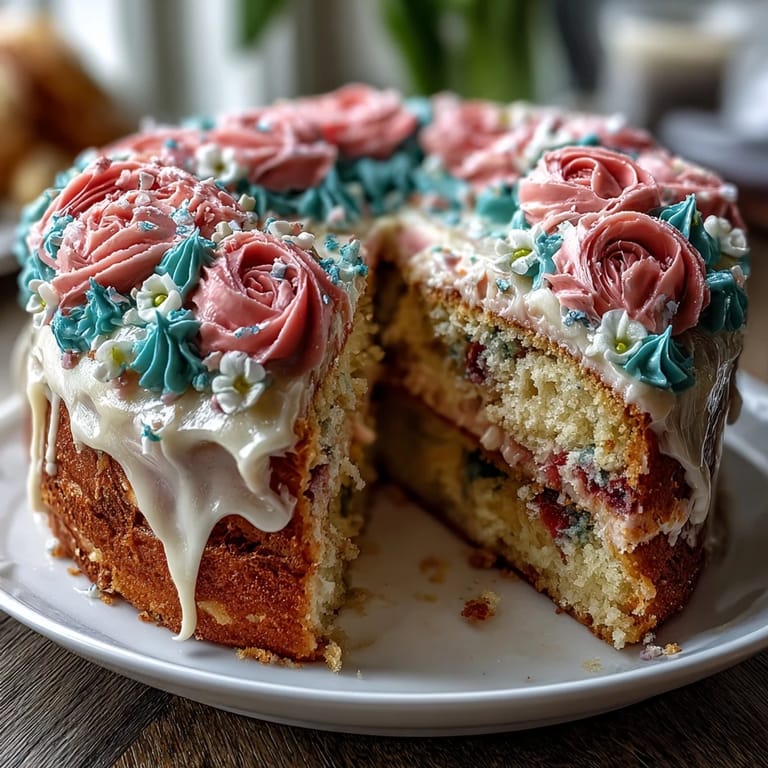
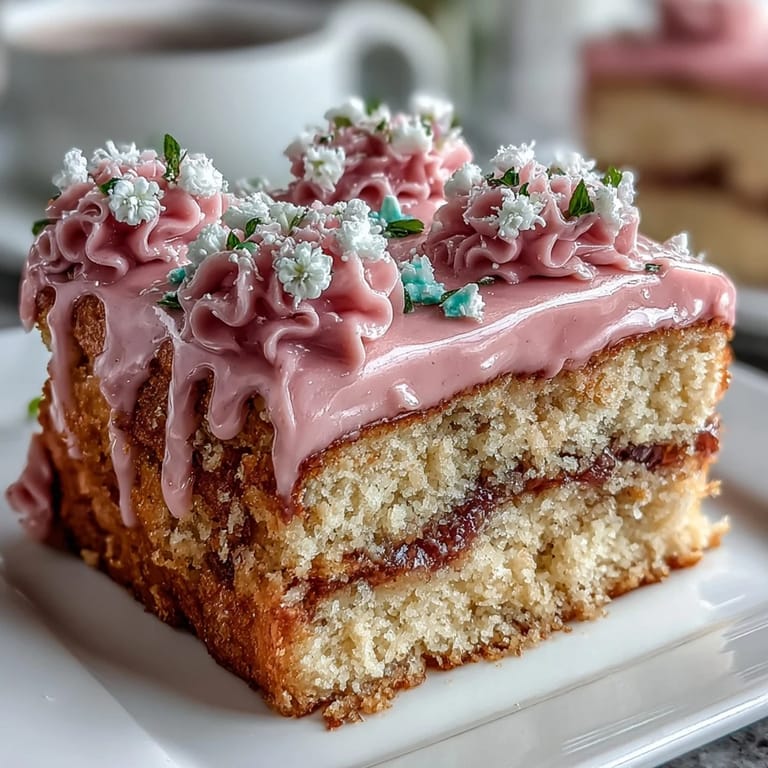
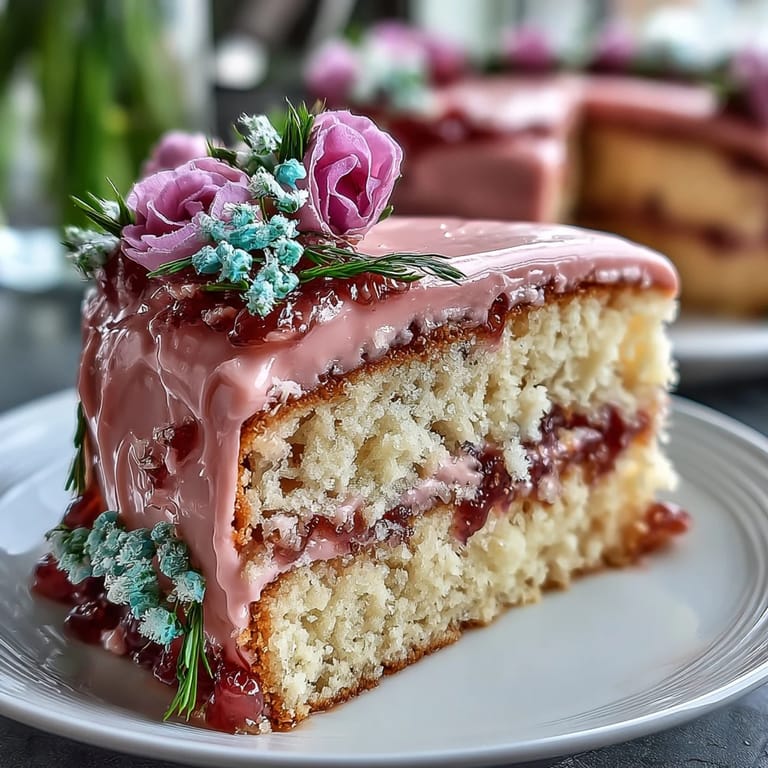
Save My sister called me three weeks before her birthday asking if I could bake her a cake, and I immediately said yes without thinking through what that meant. She wanted something that felt like spring, with those soft pastel colors that were all over her Pinterest board at the time. Standing in my kitchen on a rainy April afternoon, I realized this vanilla cake with its tender crumb and pillowy buttercream was exactly what she needed, and somehow, making it became less about following instructions and more about creating something that tasted like celebration.
I'll never forget the look on my sister's face when she saw the cake with its delicate piped flowers in soft pink, lavender, and mint green. Her friends gathered around it like it was fine art, and someone actually asked where I'd ordered it from, which felt like the highest compliment I'd ever received in my baking life.
Ingredients
- All-purpose flour: Two and a half cups gives you structure without being dense, and it's the foundation for a cake that rises evenly in the oven.
- Baking powder: Two and a half teaspoons ensures the cake lifts properly, but don't skip checking the expiration date because old baking powder is a silent cake killer.
- Salt: Just half a teaspoon, but it's the secret ingredient that makes the vanilla taste more like vanilla.
- Unsalted butter: One cup for the cake and one and a half cups for the buttercream, always at room temperature or your batter will be grainy.
- Granulated sugar: Two cups sweetens the cake and creams with the butter to trap tiny air bubbles that make it rise.
- Eggs: Four large room-temperature eggs blend smoothly into the batter and create that tender crumb you're after.
- Pure vanilla extract: One tablespoon in the cake and two teaspoons in the buttercream, and please use the real stuff because imitation tastes flat.
- Whole milk: One cup room temperature alternated with flour keeps the batter balanced and the crumb delicate.
- Powdered sugar: Six cups sifted into the buttercream prevents lumps and creates that silky texture for piping.
- Gel food coloring: Skip the liquid food coloring because it makes buttercream runny, and these soft pastels in pink, yellow, lavender, green, and blue create that spring garden feeling.
- Edible flower petals and sprinkles: Optional, but they transform a pretty cake into something magical.
Tired of Takeout? 🥡
Get 10 meals you can make faster than delivery arrives. Seriously.
One email. No spam. Unsubscribe anytime.
Instructions
- Prepare your workspace:
- Preheat your oven to 350°F and grease three 8-inch round cake pans with butter or cooking spray, then line the bottoms with parchment paper so the cakes slide out without tearing. Having everything ready before you start mixing means you won't be rushing around with batter in hand.
- Build your dry ingredients:
- Whisk together the flour, baking powder, and salt in a medium bowl, breaking up any clumps in the flour as you go. This step aerates the flour and distributes the baking powder evenly so the cake rises consistently.
- Cream the butter and sugar:
- Beat butter and sugar on medium-high speed for three to four minutes until the mixture looks pale, fluffy, and noticeably lighter in color. This is where the magic happens because you're incorporating air that will make your cake tender.
- Add the eggs carefully:
- Crack each egg into the mixture one at a time, beating well after each addition until it's fully incorporated before adding the next. If you add all the eggs at once, they won't blend smoothly and your batter will look separated and sad.
- Incorporate the vanilla:
- Mix in one tablespoon of pure vanilla extract until it's completely combined and the batter smells like vanilla cake dreams.
- Alternate the wet and dry ingredients:
- Add the flour mixture and milk alternately, starting and ending with flour, and mix on low speed until just combined. This method prevents overmixing, which would develop the gluten and make your cake tough instead of tender.
- Divide and smooth:
- Divide the batter evenly among the three prepared pans and use an offset spatula to smooth the tops so they bake evenly. If you don't have an offset spatula, the back of a spoon works, but those plastic spatulas are so cheap and useful that it's worth grabbing one.
- Bake with confidence:
- Bake for 25 to 30 minutes until a toothpick inserted in the center comes out clean or with just a few moist crumbs. The cake is done when it springs back slightly when you gently touch the top.
- Cool strategically:
- Let the cakes cool in the pans for 10 minutes so they set slightly, then turn them out onto wire racks to cool completely. Trying to decorate a warm cake is frustrating, so give yourself this time to relax and maybe make some tea.
- Make the buttercream:
- Beat softened butter in a large bowl until it's creamy and pale, then gradually add the sifted powdered sugar while continuing to beat. Add the milk, vanilla, and salt and beat for three to four minutes until the buttercream is fluffy and smooth.
- Divide and tint:
- Divide the buttercream into separate bowls and add just a tiny dab of gel food coloring to each, stirring gently until you reach that soft pastel shade you're going for. Gel coloring is concentrated, so start small and add more if needed.
- Layer with intention:
- Place one cake layer on your serving plate or cake board and spread a generous layer of buttercream on top, then repeat with the second layer and top it with the third. Make sure each layer is level so your cake doesn't lean.
- Apply the crumb coat:
- Spread a thin layer of buttercream over the entire cake to seal in the crumbs, then chill for 20 minutes so this layer sets. This invisible coat prevents crumbs from getting mixed into your final frosting layer.
- Decorate with piping bags:
- Transfer each tinted buttercream into piping bags fitted with your choice of piping tips and pipe delicate floral designs all over the cake. Start with one color and work in sections so you have a plan, and remember that wonky flowers look charming, not perfect.
- Final touches and chill:
- Sprinkle edible flower petals or sprinkles if desired and chill for 15 to 20 minutes before serving to let the buttercream set firmly. A cold cake cuts more cleanly and tastes more impressive when you slice it.
 Save
Save My sister kept that cake in her refrigerator for almost a week, telling people about it and pulling it out just to look at it before finally cutting into it. That's when I realized I wasn't just baking a cake, I was creating a memory she'd talk about for years.
The Secret to Soft Crumb
The reason this cake stays so tender has everything to do with the milk in the batter. When I first started baking, I thought milk was just moisture, but it actually contains proteins that tenderize the gluten strands, creating a softer, more delicate crumb than you'd get with just eggs and butter. Every time someone bites into this cake and their eyes go wide because it's so soft, that's the milk doing its quiet work behind the scenes.
Mastering Pastel Buttercream
Pastel colors are trickier than they seem because buttercream is white and reflects light differently than frosting on a cake in a bakery window. Start with barely a toothpick dab of gel color and mix it in completely before deciding if you need more, because the color will be slightly more saturated than you expect. I learned this the hard way when I made a batch that looked like Easter eggs instead of spring pastels.
Troubleshooting and Time Saving
If your buttercream breaks and looks curdled or separated, don't panic because you can usually save it by adding a tablespoon of milk and beating on low speed until it comes back together. If you only have two cake pans instead of three, simply bake in batches and reuse the pans after they cool, adding a few minutes to your overall time but saving you the frustration of trying to find another pan.
- For extra flavor depth, add half a teaspoon of lemon extract or almond extract to the cake batter for a subtle twist.
- If you're nervous about piping, practice on parchment paper first and remember that confidence and a steady hand matter more than perfection.
- Make the cake layers a day ahead and wrap them tightly in plastic wrap so you can focus on decoration when you have fresh energy.
 Save
Save This cake has become my go-to for anyone celebrating something special because it tastes like springtime and joy, and decorating it feels like creating art on a plate. Every time I make it, I remember my sister's face, and that's a gift that keeps giving.
Recipe FAQs
- → How do I achieve soft pastel colors in the buttercream?
Use gel food coloring sparingly and mix thoroughly into the buttercream to achieve gentle pastel shades without altering texture.
- → What is the best way to prevent the cake layers from drying out?
Follow baking times closely and allow layers to cool completely before applying buttercream to retain moisture and softness.
- → Can I prepare the buttercream ahead of time?
Yes, buttercream can be made a day prior and stored covered at room temperature; re-whip gently before use if needed.
- → What tools are recommended for creating the floral designs?
Use piping bags fitted with assorted tips like petal and leaf shapes to craft realistic floral patterns with the colored buttercream.
- → How do I ensure even layers when baking the cake?
Divide batter equally among pans and smooth the tops before baking to achieve uniform layers that stack neatly.
- → Are there suggestions to enhance the flavor profile?
Consider adding lemon or almond extract to the batter for subtle aromatic notes complementing the vanilla base.